Correct Pump Packing Installation and Packing Cutting Instructions
Proper Pump Packing Installation
- Remove all of the used pump packing rings and the lantern ring. Thoroughly clean and inspect the stuffing box.
- Replace worn shaft sleeve if needed.
- Coat each new packing ring with Pak-Lube®, Go-Jo or some type of liquid soap. Never use Anti-Seize or any metallic based compound on the pump packing!
- Stagger the joints of each packing ring 90 degrees, beginning at twelve o’clock, three o’clock, six o’clock, and then nine o’clock.
- Install each packing ring individually, carefully seating each packing ring in the bottom of the stuffing box. Use a split busing or a tamping tool. NEVER use a screwdriver or a sharp tool. It is important to seat the packing rings toward the bottom of the box because of radial expansion. (When the packing rings are properly seated, more packing rings in the set are used to create the seal, leading to longer packing life.)
- Make sure the lantern ring is properly located. This is done by inserting a small object through the flush port and feeling the lantern ring.
- After the proper amount of rings has been installed, install the gland follower and run the gland nuts up finger tight only.
- Install the proper flush set-up (see next page) and start flushing the stuffing box. It is important to start the flush before opening the suction and discharging the valves to the pump.
- Start the pump and allow the packing to leak freely at start-up. During the break-in period, adjustments should be made gradually (one flat at a time), allowing 5 to 10 minutes between adjustments. Remember, extra consideration during break-in will result in longer packing life.
- After the break-in period, the leakage rate can be controlled to 10 to 12 drops per minute per inch of shaft sleeve diameter.
Establishing the Proper Flush Set-Up
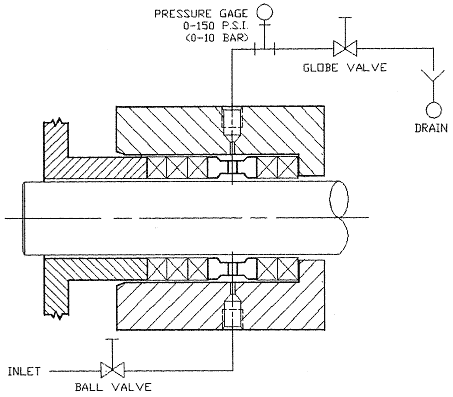
In order to establish the proper flush set-up, you must know the pressures of the stuffing box and of your water line at the equipment. For example, if the stuffing box you are packing has a pressure of 30 lbs., you need at least 50 lbs. of flush water pressure minimum. You must also take into consideration whether you ever valve the discharge down to restrict the flow of product. Remember that when you do this, you are increasing the stuffing box pressure and abrasive product will enter the stuffing box and the packing. You must set your flush pressure high enough to compensate for the extreme. It only takes one time to ruin the life of the packing! A flush is much more than just water running in one side of the box and out the other side. It not only cools and lubricates, but it also keeps the unwanted particles out of the packing. The proper flush set-up is shown in the picture above. You have a ball valve set on the supply line into the stuffing box, and on the exit side of the stuffing box you install a gauge, followed by a needle valve or a globe valve. Set the flow rate with the ball valve, adjust the pressure by throttling down the needle or globe valve. Place your hand under the exit water and if the temperature is too hot, then increase the flow until it is cool, while maintaining the proper pressure. By doing this, you reduce dilution and the amount of water to the drain. You also double the life of your packing!
Proper Packing Cutting Instructions
The best way to cut packing rings is to cut them on a mandrel. A mandrel can be fashioned with a pipe and building up wraps of duct tape until it's diameter matches the shaft diameter.
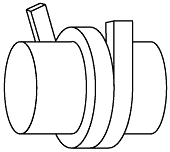 Hold the packing tightly on the mandrel, but do not stretch excessively. Cut the ring(s). Hold the packing tightly on the mandrel, but do not stretch excessively. Cut the ring(s). |
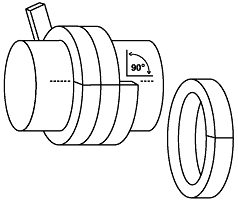 Multiple rings can be Butt Cut / 90° (square). Multiple rings can be Butt Cut / 90° (square). |
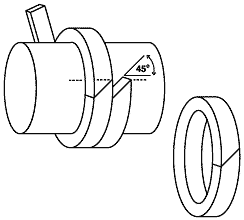
Individual rings can be Skive Cut 45° (diagonally). The best way to cut packing rings is to cut them on a mandrel with the same diameter as the shaft in the stuffing box. If there is no shaft wear, rings can be cut on the shaft outside the stuffing box.
|
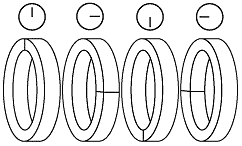 Joints of successive packing should be staggered at 90°. When enough rings have been installed so the nose of the gland will reach them, individual tamping should be supplemented by using the gland. Joints of successive packing should be staggered at 90°. When enough rings have been installed so the nose of the gland will reach them, individual tamping should be supplemented by using the gland. |
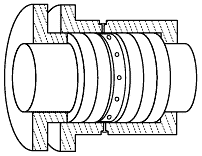 If the stuffing box has a lantern ring, make sure that the lantern ring, as installed, is slightly behind the fluid inlet so that it will move under the inlet as the follower pressure is applied. If the stuffing box has a lantern ring, make sure that the lantern ring, as installed, is slightly behind the fluid inlet so that it will move under the inlet as the follower pressure is applied. |
